RNA Flow Cell Wash Protocol
Information
This protocol is not officially supported by Oxford Nanopore. This protocol is an adapted version of the Clark Lab Protocol, developed by Anthea Hull at the University of Melbourne. The intent behind this protocol is to increase the number of available pores in RNA specific flow cells by adding in RNases, in addition to DNase provided by the wash mix, to help free up pores or motor proteins clogged by excess RNAs. I have had great success with this protocol, so I have provided it here with my modifications. If you intend to use this protocol, please proceed at your own risk.
Introduction
The Oxford Nanopore Flow Cell Wash Kit (EXP-WSH004) was designed to wash flow cells containing DNA by adding in a nuclease (DNase) to a wash buffer and flushing the solution through the flow cell. However, this wash kit does not include any RNases, and therefore fails to adequately wash either R9.4.1 or RNA004 flow cells. This protocol is an adapted version of the Oxford Nanopore wash protocol, which is fairly similar with the exception of added RNases, and can be used to greatly restore nanopores on RNA flow cells that may be clogged with excess RNA, or remove RNA that may be wrapped around motor proteins.
To carry out the protocol, you will need the following reagents. Links to each reagent are also provided.
| Reagent | Manufacturer | Catalog No. and Link |
|---|---|---|
| Flow Cell Wash Kit | Oxford Nanopore | EXP-WSH004/XL |
| RNase Cocktail Enzyme Mix | Invitrogen | AM2286 |
| RNase H | NEBio | M0297 |
Protocol
- Place the Wash Mix (WMX) on ice. Do NOT vortex the tube.
- Thaw one tube of Wash Diluent (DIL) and one tube of Storage Buffer (S) at room temperature.
- Mix the contents of the Wash Diluent (DIL) thoroughly by vortexing, then spin down briefly and place on ice.
- In a clean 1.5 mL Eppendorf DNA LoBind tube, prepare the following Flow Cell Wash Mix:
WARNING
The RNase Cocktail Enzyme Mix is quite viscous. Therefore, be careful when attempting to get 1 μL to add to your Flow Cell Wash Mix, since it is very easy to accidentally add too much.
| Reagent | Volume |
|---|---|
| Wash Diluent† (DIL) | 396 μL |
| Wash Mix (WMX) | 2 μL |
| RNase Cocktail Enzyme Mix | 1 μL |
| RNase H | 1 μL |
| Total | 400 μL |
Note
†The Wash Diluent appears to be 300 mM KCl, 2 mM CaCl2, 10 mM MgCl2, and 15 mM HEPES in PCR H2O adjusted to a pH of 8.0. You may be able to make more using reagents in the lab, although I have not tested this.
- Mix well by pipetting and place on ice. Do NOT vortex the tube.
- Stop or pause the sequencing experiment in MinKNOW, and leave the flow cell in the device.
WARNING
It is vital that the flow cell priming port and SpotON sample port are closed before removing the waste buffer to prevent air from being drawn across the sensor array area, which would lead to a significant loss of sequencing channels. It is also advisable that during the wash you keep the light shield on the flow cell if you plan to reload or rerun a sample straight away.
- Remove the waste buffer as follows:
- Close the priming port and SpotON sample port cover, as indicated in the figure below.
- Insert a P1000 pipette into waste port 1 and remove the waste buffer.
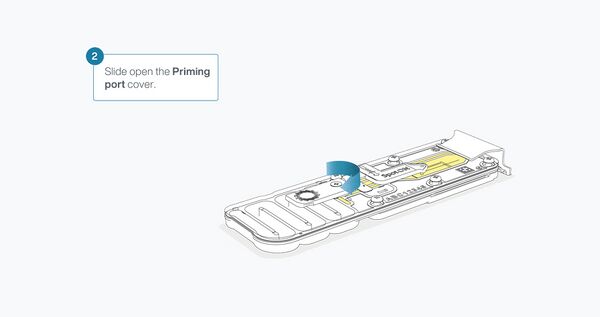
- Slide the flow cell priming port cover clockwise to open.
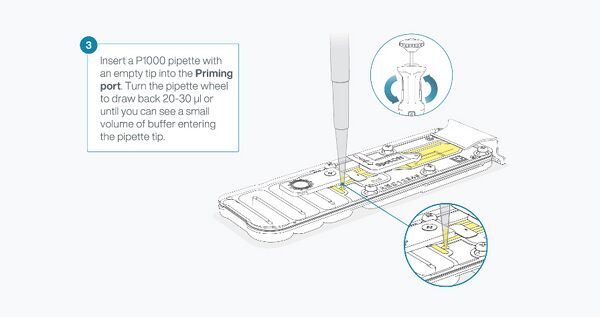
- After opening the priming port, check for a small air bubble under the cover. Draw back a small volume to remove any bubbles:
- Set a P1000 pipette to 200 μL.
- Insert the tip into the flow cell priming port.
- Turn the wheel until the dial shows 220-230 μL, or until you can see a small volume of buffer/liquid entering the pipette tip.
- Visually check that there is continuous buffer from the flow cell priming port across the sensor array.
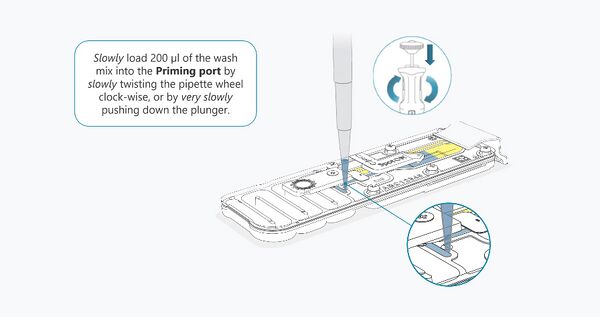
- Slowly load 200 μL of the prepared Flow Cell Wash Mix into the priming port, as follows:
- Using a P1000 pipette, take 200 μL of the Flow Cell Wash Mix.
- Insert the pipette tip into the priming port, ensuring there are no bubbles in the tip.
- Slowly twist the pipette wheel down to load the flow cell (if possible with your pipette) or push down the plunger very slowly, leaving a small volume of buffer in the pipette tip.
- Set a timer for a 5 minute incubation.
- Once the 5 minute incubation is complete, carefully load the remaining 200 μL of the prepared flow cell wash mix into the priming port, as follows:
- Using a P1000 pipette, take the remaining 200 μL of the Flow Cell Wash Mix.
- Insert the pipette tip into the priming port, ensuring there are no bubbles in the tip.
- Slowly twist the pipette wheel down to load the flow cell (if possible with your pipette) or push down the plunger very slowly, leaving a small volume of buffer in the pipette tip.
- Close the priming port and wait for 1 hour.
- Remove the waste buffer, as follows:
- Ensure the priming port and SpotON sample port covers are closed, as indicated in the figure below.
- Insert a P1000 pipette into waste port 1 and remove the waste buffer.
- Mix the contents of the Storage Buffer (S) by pipetting and spin down briefly.
- Slide the flow cell priming port cover clockwise to open.
- After opening the priming port, check for a small air bubble under the cover. Draw back a small volume to remove any bubbles:
- Set a P1000 pipette to 200 μL.
- Insert the tip into the flow cell priming port.
- Turn the wheel until the dial shows 220-230 μL, or until you can see a small volume of buffer/liquid entering the pipette tip.
- Visually check that there is continuous buffer from the flow cell priming port across the sensor array.
- Slowly add 500 μL of Storage Buffer (S) through the flow cell priming port.
- Close the priming port.
- Remove all fluid from the waste channel through waste port 1 using a P1000 pipette.
- The flow cell can now be stored at 4-8°C or used straight away as if it were a new flow cell.
Note
As both the priming and SpotON sample port are closed, no fluid should leave the sensor array area.
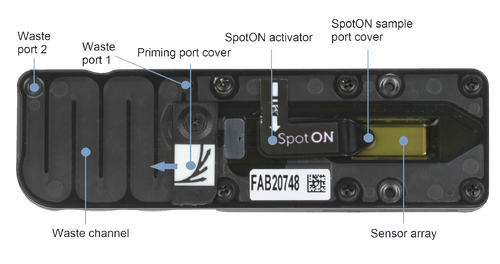

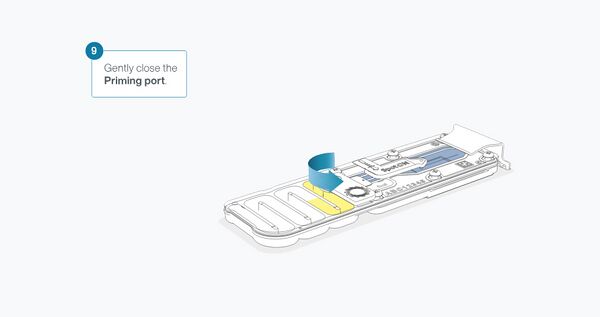
Note
As both the priming and SpotON sample port are closed, no fluid should leave the sensor array area.


Note
As both the flow cell priming port and SpotON sample port are closed, no fluid should leave the sensor array area.

Tip
It is at this point that I advise you resume your sequencing run or start a new "run" in MinKNOW to check the number of available pores for sequencing before storage or running a fresh library. Note that you can run a Flow Cell check to achieve this, but I have found in the past that the available pores shown from a Flow Cell check can be inaccurate. You will also be able to see if any residual sequencing is occurring with your flow cell, which may prompt you to do a second wash.
